
Crypto Investment Rebalancer Project
Crypto Investment Rebalancer Project
Part 1 - The Introduction
I will begin this paper by outlining our plans for creating a cryptocurrency portfolio rebalancer. Before I do so, I must explain what crypto rebalancing is and how it works.
Crypto rebalancing explained
Let’s start with the basic scenario. As an investor, you have a cryptocurrency portfolio that holds 50% in Bitcoin and 50% in Ethereum. When the value of the coins changes over time, the allocation is no longer 50/50, and could be 45/55, for example. Now, your portfolio is out of balance.
A cryptocurrency rebalancer ensures that the 50/50 allocation is restored. This way, your portfolio will always be in the desired allocation state you want.
Benefits of using rebalancing
Using a cryptocurrency rebalancing strategy can be beneficial for a number of reasons.
Firstly, it helps to maintain a more diversified portfolio, as the rebalancer ensures that the portfolio remains in its desired allocation state. This way, investors can avoid having too much of their portfolio invested in one asset, thus mitigating the risks associated with volatility.
Additionally, rebalancing can help investors capitalize on market opportunities. When the prices of certain coins fluctuate, rebalancing ensures that investors can take advantage of these changes and maximize their profits. Rebalancing also reduces the amount of time spent monitoring the markets, providing a more hands-off approach to crypto investing.
Cons of using rebalancing
Rebalancing can have drawbacks. For example, it can lead to transaction costs that reduce profits. Additionally, rebalancing can cut short an asset that is in a strong uptrend.
Part 2 - Why this paper? The use case?
What is the use case of this paper if you can rebalance your portfolio manually, without using a script?
Automation
Crypto rebalancing can be a tedious process for many investors, taking hours or even days to adjust a portfolio of various digital assets. This script will save investors a lot of time by automating the rebalancing process.
No emotions involved
When using an automated script, you don’t have to let your emotions get in the way. Many investors don’t stick to their plan and end up making decisions based on greed, hype, and other factors. By using a script, you can ensure that your investment goals remain on track and that you’re not being influenced by outside forces.
Saving Costs and security
There are many rebalancing services available, but many don’t use my exchange or seem suspicious, as they require API keys and access to my account. Additionally, they are expensive and require monthly fees. When I create my own script, I know exactly what’s happening and can run it for free.
Part 3 - Technologies we will use
I will now discuss the technologies we will use to create the rebalancer.
Python
We will program the rebalancer in Python, a scripting language with a straightforward syntax and many modules to extend its functionality, such as requests for making web requests. This makes it an ideal choice for this project. Ensure that you have Python installed on your computer. You can obtain it from here:
Exchange API
We need an exchange API for our program to interact with our portfolio. Most major exchanges, such as Binance, okx, etc., have an API. For this project, we will use the Crypto.com exchange. The core concept of the code will remain the same for different exchanges; only the API calls will differ. We need three API calls: one to buy coins, one to sell coins, and one to view the coins in your portfolio. As long as the exchange you want to use provides these three endpoints, you are ready to go.
Visual Studio Code
Visual Studio Code is a free lightweight code editor that makes writing Python code simple. You can get it from the official website:
Visual Studio Code - Code Editing. Redefined
Deployment
To deploy the script, we need a way to run it 24/7. I have listed two options in this paper; I will be using a Raspberry Pi.
Cloud Hosting
You could run your script in the cloud 24/7. Replit is a great option for cloud hosting to run Python, as it has a web-based code editor for easy code editing on the go. Another more advanced cloud hosting provider that supports Python is Heroku.
Raspberry Pi
The Raspberry Pi is a small and affordable computer, making it ideal for projects like this, as You can host your code for a lower cost without having to worry about cloud services.
Prerequisites
You don’t need any prior knowledge to follow this tutorial and get the same result as me. However, I recommend having a basic understanding of APIs, Python, and crypto before starting this project. This will ensure that you understand what you’re doing when managing your investments programmatically. Without the right knowledge and experience, you may suffer unnecessary financial losses due to coding error’s.
Part 4 - Development
To set up your rebalancer, follow these steps. By the end of this guide, you should have a working rebalancer of your own.
Before we begin programming, let’s take a look at the basic structure of our program. It consists of four files:
- A configuration file
- An exchange module
- The logic
- The main script
The configuration holds the desired allocation. The exchange module contains the code to execute the necessary API requests to the exchange. The logic module includes the functions to handle the rebalancer’s allocation calculations, etc. Lastly, the main script combines all the parts into a working rebalancer.
Let’s start programming our rebalancer. We’ll go through the code step-by-step, explaining the logic and principles that make it work. That way, you’ll understand how it functions. By the end of this journey, you’ll have a good grasp of what’s happening behind the scenes and be able to use the rebalancer confidently.
Creating the config file
We need a configuration file, **config.json**, to store your desired portfolio allocations. This will ensure that your investments are allocated as you wish and make it easy to make changes.
The config file needs:
- The coins you want
- The desired allocation for each coin
{
    "BTC" : 50,
		"ETH" : 50
}
In the code above, I configured a 50/50 split of Bitcoin (BTC) and Ethereum (ETH). This works well for the purposes of this paper, but you can adjust it to your preference.
Let’s explain the code:
We have an object with key-value pairs: one for the coin and each coin has the desired allocation. This makes it simple to add new pairs to the object and adjust the allocations accordingly.
API calls
Intro
Create a file named **exchange.py** that contains all the functions responsible for interacting with the exchange.I used the Crypto.com exchange in this paper. The API documentation can be found at https://exchange-docs.crypto.com/. To complete the task, I needed four pieces of functionality:
get_coin_balance()buy(<coin>, <amount>)sell(<coin>, <amount>)get_coin_price(<coin>)
These functions require the API endpoints private/get-account-summary,private/create-order and public/get-ticker.
Let’s explain these endpoints a bit deeper. so you get a good understanding of what is going on.
private/get-account-summary takes one optional parameter: the coin. For this use case, we don’t need to add the coin in parameters since we need the full account balance.
The response of this endpoint looks like this:
{
    "id": 11,
    "method": "private/get-account-summary",
    "code": 0,
    "result": {
        "accounts": [
            {
                "balance": 99999999.905000000000000000,
                "available": 99999996.905000000000000000,
                "order": 3.000000000000000000,
                "stake": 0,
                "currency": "CRO"
            }
        ]
    }
}
we need the balance of all the currency’s to calculate the allocations.
private/create-order takes more parameters and is responsible for buying and selling crypto. The parameters required are:
instrument_name: the name of the trading pair, e.g. BTC_USDT.side: buy or sell.type: the type of order; we will use a MARKET order to buy and sell immediately at market price.notional: the amount to spend.
The response of this endpoint is simply a confirmation of the order.
The last endpoint we need is the public/get-ticker one. We need this to calculate the USDT value of our holdings, since the account summary only returns the available balance of the coins. It takes one parameter, instrument_name, which is the trading symbol you want, e.g. BTC_USDT.
You can leave this parameter empty to get the price data of all coins, but it’s easier to request the coins themselves. The response doesn’t work with key-value pairs, and just returns an array with all the prices. To use this, you’d have to loop over the array and compare your coins with the ones in the response. It’s easier to just request the coins themselves.
{
    "id": -1,
    "method": "public/get-tickers",
    "code": 0,
    "result": {
        "data": [{
            "h": "51790.00",
            "l": "47895.50",
            "a": "51174.500000",
            "i": "BTCUSD-PERP",
            "v": "879.5024",
            "vv": "26370000.12",
            "oi": "12345.12",
            "c": "0.03955106",
            "b": "51170.000000",
            "k": "51180.000000",
            "t": 1613580710768
        }]
    }
}
We need to extract the a from the data, as it is the most recent price of the coin. If you want more information about the other prices, you can read the exchange documentation.
It’s time to begin programming all the functions. It’s essential to comprehend the API we use so you can comprehend what is happening in the code.
Essential setup
To get started, we need to obtain an API key from the crypto.com exchange. Log in and navigate to the Settings page. Under the API Key tab.
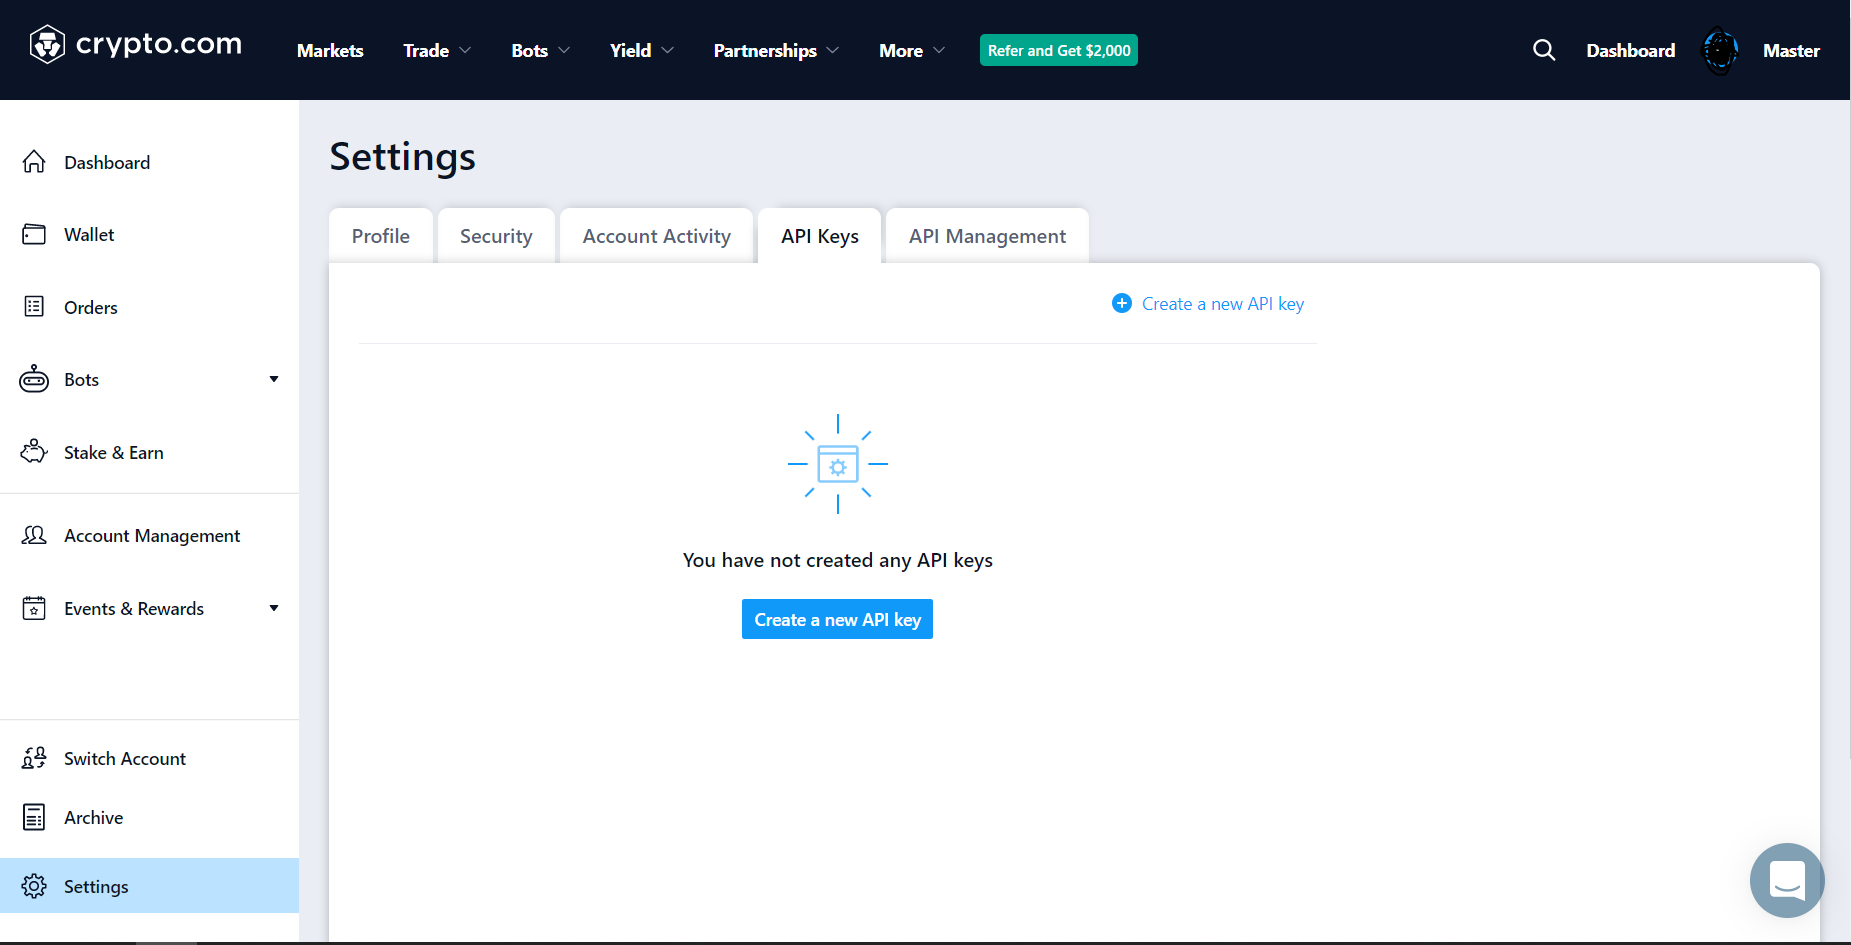
Figure 1 - Crypto.com settings
Press the Create a New API Key button. A screen like this should appear:
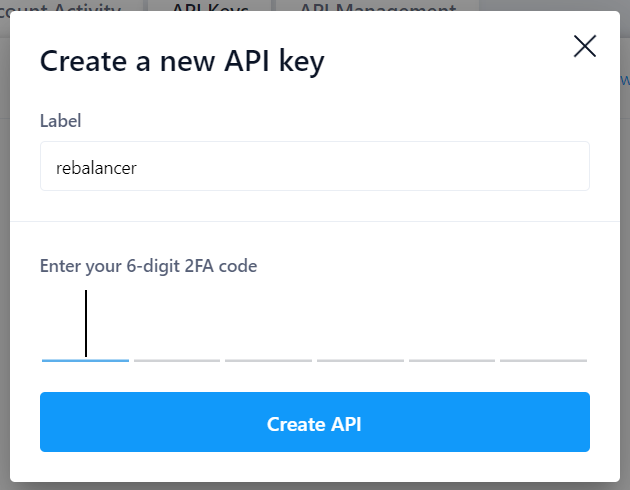
Figure 2 - Create a new API key
Enter a label and 2FA code and the API keys will be generated.
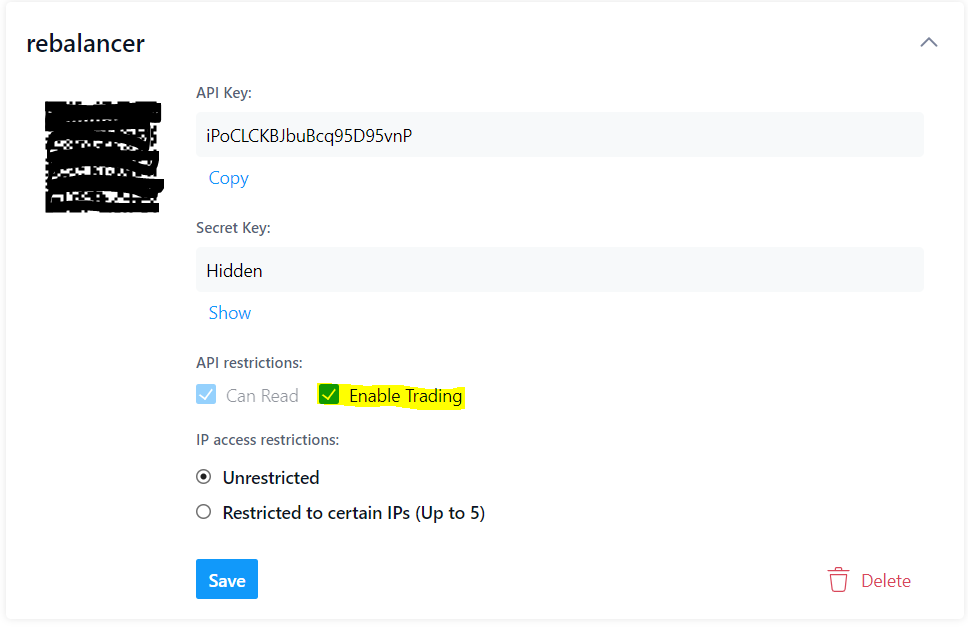
Figure 3 - API key settings
Ensure that Enable Trading is checked; otherwise, we won’t be able to purchase or sell. Save both the API key and secret key.
Never share the secret key or the QR code on the side, as they both provide access to your funds. If anyone were to obtain these, they could use the exchange API to withdraw your money.
Ensure that you save the API key by clicking the Save button on the left-hand side when you are finished.
Now that that’s out of the way, let’s start programming the exchange module. We’ll begin with some basics and setup.
In the exchange.py file, import the following:
import hmac
import hashlib
import requests
import time
We will need these later. Let’s declare the variables that store the keys.
api_key = "<KEY HERE>"
secret_key = "<KEY HERE>"
If you host this on a cloud service or push it to a public repository like GitHub, be sure to remove the keys from your code and use a different approach, such as a .env file. Since I won’t be publishing my code, I’ll leave it as is.
We need to add the base API URL for the exchange to our code.
cryptoURL = "https://api.crypto.com/v2/"Digital Signature
Before we can begin programming our own functions, we need to create the digital signature function described here:
Crypto.com Spot API v2.1 for Exchange
This will enable us to securely sign our requests and verify their authenticity.
The function is written as follows:
def digitalSignature(req):
    paramString = ""

    if "params" in req:
        for key in sorted(req['params']):
            paramString += key
            paramString += str(req['params'][key])

    sigPayload = req['method'] + str(req['id']) + \
        req['api_key'] + paramString + str(req['nonce'])

    req['sig'] = hmac.new(
        bytes(str(secret_key), 'utf-8'),
        msg=bytes(sigPayload, 'utf-8'),
        digestmod=hashlib.sha256
    ).hexdigest()

    return req
We pass the parameters in the req variable to the digital signature function. This creates a string from the parameters and appends the private key and then encodes it. If you don’t understand what’s happening, don’t worry.
At this point, we have all the essentials required to create the other functions. Your file should look like this:
import hmac
import hashlib
import requests
import time

cryptoURL = "https://api.crypto.com/v2/"
api_key = "<KEY HERE>"
secret_key = "<KEY HERE>"

def digitalSignature(req):
    paramString = ""

    if "params" in req:
        for key in sorted(req['params']):
            paramString += key
            paramString += str(req['params'][key])

    sigPayload = req['method'] + str(req['id']) + \
        req['api_key'] + paramString + str(req['nonce'])

    req['sig'] = hmac.new(
        bytes(str(secret_key), 'utf-8'),
        msg=bytes(sigPayload, 'utf-8'),
        digestmod=hashlib.sha256
    ).hexdigest()

    return req
get_coin_balance()
Now we can start on developing the four functions we need for our rebalancer to work. Let’s start with the get_coin_balance() one.
Declare the function.
def get_coin_balance():let’s begin by creating the parameters we need to include in our request.
req = {
	"id": 11,
  "method": "private/get-account-summary",
	"api_key": api_key,
	"params": {
	},
	"nonce": int(time.time() * 1000)
}
Sign the request with the digital signature.
sig = digitalSignature(req)Post the request using Python’s requests module and save the response as a JSON object.
response = requests.post(cryptoURL + "private/get-account-summary", json=sig)

result = response.json()
Extract the account array containing all balances and return it.
account = result["result"]["accounts"]

return account
The full function:
def get_coin_balance():
    req = {
        "id": 11,
        "method": "private/get-account-summary",
        "api_key": api_key,
        "params": {
        },
        "nonce": int(time.time() * 1000)
    }

    sig = digitalSignature(req)

    response = requests.post(
        cryptoURL + "private/get-account-summary", json=sig)

    result = response.json()

    account = result["result"]["accounts"]

    return account
Let’s test the function we just created to see if communication with the exchange is working. Print the output:

Figure 4 - output of the exchange balance
You should get something like this. We can view all coins in my portfolio with the available balance. It’s wise to leave a small amount, like 5 euros, in your account. That way, if something goes wrong, you won’t lose too much. The get_coin_balance() function is complete.
buy(, ) and sell(, )
Let’s move on to the buy(<coin>, <amount>) and sell(<coin>, <amount>) functions. These functions allow users to buy and sell coins.
Since the two functions both use the private/create-order endpoint we can merge them into one order(<coin>, <amount>, <side>) function. This will reduce redundant code, as the two functions are essentially the same, the only difference being the side in the request.
Start with declaring the function:
def order(coin, amount, side):Then create the request again:
req = {
        "id": 11,
        "method": "private/create-order",
        "api_key": api_key,
        "params": {
            "instrument_name": coin + "_USDT",
            "side": side,
            "type": "MARKET",
            "notional": amount
        },
        "nonce": str(int(time.time() * 1000))
    }
We need parameters in the request this time. The instrument_name is the trading pair, e.g. BTC_USDT. The side should be either BUY or SELL. We made it into one function instead of two because the only difference between buying and selling is this parameter. The type should be MARKET, so we buy and sell at the latest traded price. Lastly, notional is the amount we should spend.
Just like before we sign the request and post is using request the response is just a confirmation of the order. The function should not return anything.
Let’s signing the request and post it. The response is simply a confirmation of the order; no additional data should be returned.
sig = digitalSignature(req)

response = requests.post(cryptoURL + "private/create-order", json=sig)

print(response)
The complete function looks like this:
def order(coin, amount, side):
    req = {
        "id": 11,
        "method": "private/create-order",
        "api_key": api_key,
        "params": {
            "instrument_name": coin + "_USDT",
            "side": side,
            "type": "MARKET",
            "notional": amount
        },
        "nonce": str(int(time.time() * 1000))
    }

    sig = digitalSignature(req)

    response = requests.post(
        cryptoURL + "private/create-order", json=sig)

print(response)get_coin_price()
The last function we need is the get_coin_price one to get the latest traded price of a coin. Let’s start with declaring the function:
def get_coin_price(coin):We no longer need to post any parameters or sign the request, as this is a public endpoint, not a private one.
Use requests.get instead of .post; this is important, otherwise the function won’t work.
response = requests.get(cryptoURL + "public/get-ticker?instrument_name=" + coin
+ "_USDC")
The last thing is to extract the latest traded price out of the response.
result = response.json()
price = result["result"]["data"][0]["a"]

return float(price)
The finished function:
def get_coin_price(coin):
    response = requests.get(cryptoURL + "public/get-ticker?instrument_name=" + coin + "_USDC")
    result = response.json()
    price = result["result"]["data"][0]["a"]

    return float(price)
Let’s test this and ask for the price of Bitcoin.
print(get_coin_price("BTC"))
Figure 5 - output of the price
As you can see this is working as intended. The exchange module is now complete and has all the features we require.
The completed code
import hmac
import hashlib
import requests
import time

cryptoURL = "https://api.crypto.com/v2/"
api_key = "<KEY HERE>"
secret_key = "<KEY HERE>"

def get_coin_price(coin):
    response = requests.get(cryptoURL + "public/get-ticker?instrument_name=" + coin + "_USDC")
    result = response.json()
    price = result["result"]["data"][0]["a"]

    return float(price)

def get_coin_balance():
    req = {
        "id": 11,
        "method": "private/get-account-summary",
        "api_key": api_key,
        "params": {
        },
        "nonce": int(time.time() * 1000)
    }

    sig = digitalSignature(req)

    response = requests.post(
        cryptoURL + "private/get-account-summary", json=sig)

    result = response.json()

    account = result["result"]["accounts"]

    return account

def order(coin, amount, side):
    req = {
        "id": 11,
        "method": "private/create-order",
        "api_key": api_key,
        "params": {
            "instrument_name": coin + "_USDT",
            "side": side,
            "type": "MARKET",
            "notional": amount
        },
        "nonce": str(int(time.time() * 1000))
    }

    sig = digitalSignature(req)

    response = requests.post(
        cryptoURL + "private/create-order", json=sig)

    print(response)

def digitalSignature(req):
    paramString = ""

    if "params" in req:
        for key in sorted(req['params']):
            paramString += key
            paramString += str(req['params'][key])

    sigPayload = req['method'] + str(req['id']) + \
        req['api_key'] + paramString + str(req['nonce'])

    req['sig'] = hmac.new(
        bytes(str(secret_key), 'utf-8'),
        msg=bytes(sigPayload, 'utf-8'),
        digestmod=hashlib.sha256
    ).hexdigest()

    return req
Logic
Intro
Create the file logic.py. We will create all the needed logic in this file to use in the main script file.
Let’s go over the three main functions we need here:
check_balancing(<desired_state>)calculate_current_portfolio()calculate_allocations(<total_value>, <desired_state>)
check_balancing(<desired_state>) will check if the portfolio is in line with the configured desired state. This function should return either True or False.
calculate_current_portfolio() should calculate the allocations on the exchange. This function should be called in the check_balancing(<desired_state>) function.
To calculate the current portfolio, we can use the get_coin_balance() from the exchange.py module. The function should loop over all the coins in the portfolio and get the coin price of those coins using get_coin_price(<coin>).
Then, calculate the USDT values of each coin and the total portfolio value. With that, we can compute the % allocations. Return these % allocations and use them in the check_balancing(<desired_state>) function.
calculate_allocations(<desired_state>) should calculate the allocations based on the total USDT value of the portfolio. This function should be invoked after rebalancing has begun and all crypto has been exchanged for USDT.
This is the basic outline of the **logic.py** file. Let’s review all the code required to accomplish this.
Essential setup
We must first import the exchange module.
import exchangecalculate_current_portfolio()
since the check_balancing(<desired_state>) function needs this we should program this first. Start with declaring the function:
def calculate_current_portfolio():We then need 2 variables one to save the portfolio in and 1 to save the total value of the portfolio.
total_value = 0.00
portfolio = {}
The next step is to request our balance on the exchange.
current_portfolio = exchange.get_coin_balance()The next step is to calculate the USD value of each of our holdings and save the total value.
i = 0
while i < len(current_portfolio):
  currency = current_portfolio[i]["currency"]
  balance = current_portfolio[i]["available"]
  usd_value = balance * exchange.get_coin_price(currency)
  total_value += usd_value
  portfolio[currency] = usd_value
  i += 1
We now have an array with the same structure as the config file. The only step left is to calculate the allocation percentage based on the total value, since the object now contains the currencies and their USD value.
for currency, value in portfolio.items():
	portfolio[currency] = round((value / total_value) * 100, 2)

return portfolio
This will replace the USD values with the % allocated.

Figure 6 - Output of the % allocations
This is the portfolio we return. It’s now easy to compare, since we have the same structure as the configuration file with the desired state.
The complete function:
def calculate_current_portfolio():
    total_value = 0.00
    portfolio = {}

    current_portfolio = exchange.get_coin_balance()

    i = 0
    while i < len(current_portfolio):
        currency = current_portfolio[i]["currency"]
        balance = current_portfolio[i]["available"]
        usd_value = balance * exchange.get_coin_price(currency)
        total_value += usd_value
        portfolio[currency] = usd_value
        i += 1

    for currency, value in portfolio.items():
        portfolio[currency] = round((value / total_value) * 100, 2)

    return portfolio
check_balancing(<desired_state>)
We can now compare the two and decide whether rebalancing is necessary. Declare the function:
def check_balancing(desired_state):then request the current_portfolio with calculate_current_portfolio():
current_portfolio = calculate_current_portfolio()The final step is to compare the desired state with the current portfolio. Start with comparing the keys match of each object this will filter out if we have coins that shouldn’t be in our portfolio.
if set(current_portfolio.keys()) != set(desired_state.keys()):
	return False
We compare the % allocations and give a 5% margin of tolerance. If a coin is more than 5% out of balance, we will rebalance it.
for currency, value in desired_state.items():
	if abs(value - current_portfolio[currency]) > 5:
		return False
Return true if the portfolio is balanced.
return TrueThe full function:
def check_balancing(desired_state):
    current_portfolio = calculate_current_portfolio()

    if set(current_portfolio.keys()) != set(desired_state.keys()):
        return False

    for currency, value in desired_state.items():
        if abs(value - current_portfolio[currency]) > 5:
            return False

    return True
calculate_allocations(<desired_state>)
Once rebalancing begins, we should calculate allocations based on the total USD value. Declare the function:
def calculate_allocations(desired_state):We need to get the USD balance. We can do this using the get_coin_balance() function. However, we need to make a slight modification to ensure we can query the USDT balance specifically.
Modify the function so it works like this:
def get_coin_balance(currency=None):
    params = {}
    if currency:
        params["currency"] = currency

    req = {
        "id": 11,
        "method": "private/get-account-summary",
        "api_key": api_key,
        "params": params,
        "nonce": int(time.time() * 1000)
    }
We used to only be able to request the full balance of the portfolio. Now, if we include USDT in the parameters when calling the function, we’ll get the USDT value instead.
Let’s return to the calculate_allocations(desired_state) function. First, we’ll request the USDT balance of our portfolio. This will give us the total_value we can spend.
total_value = exchange.get_coin_balance("USDT")
balance = total_value[0]["available"]
Next, we need to calculate the allocations for each coin. Store the results in an object and return it to the main script, so it can use it to purchase.
amounts_to_spend = {}

for currency, desired_percentage in desired_state.items():
	desired_value = balance * (desired_percentage / 100)
	amounts_to_spend[currency] = desired_value

return amounts_to_spend
For each currency, we get the desired percentage. We then calculate the desired value of that coin and add it to the amounts_to_spend object. Finally, we return the object once we are done.
The full function:
def calculate_allocations(desired_state):
    total_value = exchange.get_coin_balance("USDT")
    balance = total_value[0]["available"]

    amounts_to_spend = {}

    for currency, desired_percentage in desired_state.items():
        desired_value = balance * (desired_percentage / 100)
        amounts_to_spend[currency] = desired_value

    return amounts_to_spend
The completed code
Don’t forget to update
exchange.pyas previously mentioned if you copy and paste the entire code blocks!
import exchange

def check_balancing(desired_state):
    current_portfolio = calculate_current_portfolio()

    if set(current_portfolio.keys()) != set(desired_state.keys()):
        return False

    for currency, value in desired_state.items():
        if abs(value - current_portfolio[currency]) > 5:
            return False

    return True

def calculate_current_portfolio():
    total_value = 0.00
    portfolio = {}

    current_portfolio = exchange.get_coin_balance()

    i = 0
    while i < len(current_portfolio):
        currency = current_portfolio[i]["currency"]
        balance = current_portfolio[i]["available"]
        usd_value = balance * exchange.get_coin_price(currency)
        total_value += usd_value
        portfolio[currency] = usd_value
        i += 1

    for currency, value in portfolio.items():
        portfolio[currency] = round((value / total_value) * 100, 2)

    return portfolio

def calculate_allocations(desired_state):
    total_value = exchange.get_coin_balance("USDT")
    balance = total_value[0]["available"]

    amounts_to_spend = {}

    for currency, desired_percentage in desired_state.items():
        desired_value = balance * (desired_percentage / 100)
        amounts_to_spend[currency] = desired_value

    return amounts_to_spend
Main script
Intro
Create a file called main.py. This script should begin by loading the desired allocation and verifying that the portfolio is in balance. If not, it should sell all crypto and buy again to maintain the desired state. After rebalancing, it should loop inside a scheduler that repeats the rebalancing code once a week.
In essence we need 2 functions:
scheduler()rebalance()
The scheduler() function should call the rebalance() function once a week.
The rebalance() function should first check if rebalancing is necessary by using check_balancing(<desired_state>). If so, it should sell all crypto and calculate the total value of USDT in the wallet with calculate_allocations(<total_value>).
Once the allocations have been calculated, the function should buy the crypto again, thus completing the rebalancing.
Essential setup
Import the logic and exchange and json modules to get started.
import logic
import exchange
import json
Load the desired state at the begin of the file:
f = open("config.json")

desired_state = json.load(f)
Declare a start() function to initiate the script:
def start():Once that’s done, we should check if rebalancing is needed. Once that check is complete, the start function is finished.
if not logic.check_balancing(desired_state):
	rebalancer()
The full start function:
def start():
    if not logic.check_balancing(desired_state):
        rebalancer()
rebalance()
If the rebalance function is called, it should sell all crypto and then calculate the new allocations that should be bought. Afterwards, it should buy them.
def rebalancer():To sell all the crypto we have we will loop over the coins and execute a sell order.
for currency in desired_state:
        total_value = exchange.get_coin_balance(currency)
        balance = total_value[0]["available"]
        exchange.order(currency, balance, "SELL")
We can now call the calculate_allocations(desired_state) function since all our coins have been exchanged for USDT.
allocations = logic.calculate_allocations(desired_state)

for currency in allocations:
	exchange.order(currency, allocations[currency], "BUY")
The rebalancing is now complete, the full function:
def rebalancer():
    for currency in desired_state:
        total_value = exchange.get_coin_balance(currency)
        balance = total_value[0]["available"]
        exchange.order(currency, balance, "SELL")

    allocations = logic.calculate_allocations(desired_state)

    for currency in allocations:
        exchange.order(currency, allocations[currency], "BUY")
scheduler()
We reached the end of our technical explanation. The scheduler is the last part that needs to be coded in order to have a functioning rebalancing script.
We have a Python module called schedule that can be used for this. More details can be found here.
Open a command terminal and execute the following to install this module using pip:
pip install <module-name>
pip install scheduleAdd the following import statements to the top of your main.py file:
import schedule
import time
start a schedule job at the end of your file:
schedule.every().sunday.do(start)and now create an infinite loop that checks if there are pending jobs that needs to be run:
while True:
	schedule.run_pending()
	time.sleep(86400) # sleep for 24 hours
now the scheduler is finished and will start the rebalancing script every sunday.
The completed code
import logic
import exchange
import json
import schedule
import time

f = open("config.json")

desired_state = json.load(f)

def rebalancer():
    for currency in desired_state:
        total_value = exchange.get_coin_balance(currency)
        balance = total_value[0]["available"]
        exchange.order(currency, balance, "SELL")

    allocations = logic.calculate_allocations(desired_state)

    for currency in allocations:
        exchange.order(currency, allocations[currency], "BUY")

def start():
    if not logic.check_balancing(desired_state):
        rebalancer()

schedule.every().sunday.do(start)

while True:
    schedule.run_pending()
    time.sleep(86400)
Wrapping up deployment
Let’s quickly review how to run and deploy your rebalancer. As previously mentioned, I will be using a Raspberry Pi, so you need to copy your files to it.
Ensure that you have both Python and Schedule installed on your Raspberry Pi
Run the script with this command:
nohup python main.py &This will ensure the script continues running in the background.
Part 5 - Conclusion
A quick recap
Let’s recap what we’ve learned and done. Firstly, we worked with an exchange API and learned how to trade cryptocurrencies using code. We also looked at what needs to be done to rebalance a portfolio and why it’s advantageous. We took a modular approach to developing the script, making it easy to extend.
Four main files were created:
- The main script that handles scheduling and rebalancing.
- The exchange module holds code used to execute communications with the exchange. This file can be easily swapped if a different exchange is used.
- The logic module contains functions that handle calculations.
- A configuration file holds the desired state.
What’s next?
There are still possibilities to build on what we have created. The code is divided into separate files and modules, making it easy to extend and create a more sophisticated version of the rebalancer. Let’s explore some potential extensions.
- Only rebalance coins that are out of balance: The script now sells all crypto and then buys them back, but this incurs more transaction costs than if you only sold the ones that are out of balance.
- Web Scraping: Let’s say you want to create a portfolio of the top 10 DeFi coins. A web scraper can help you do this by gathering the top 10 coins from the internet and adding them to your portfolio. You can then periodically rescrape the coins and, if the top 10 have changed, your portfolio will adjust accordingly.
Conclusion
In this paper, we have explored the concept of a crypto rebalancer script, as well as how to implement one. By following the steps outlined, you should now have a working rebalancer that can help you manage your cryptocurrency portfolio. With the help of this script, you can ensure that your portfolio stays balanced, and you can make investment decisions with confidence.
Literature sources used to develop this paper
Rebalancing: Definition, Why It’s Important, Types and Examples
Guide to popular crypto rebalancing strategies | CoinLoan Blog